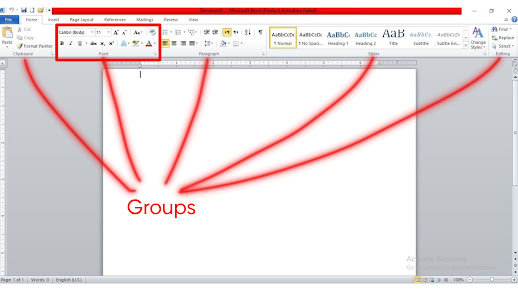
Welcome to Chapter 1 of our Comprehensive Microsoft Word Course! In this chapter, we will introduce you to the basics of Microsoft Word and help you become familiar with the Word interface.
Understanding the Word Interface:
1. When you open Microsoft Word, you will see the main Word window. This window consists of various elements, including the ribbon, toolbar, document area, and status bar.
2. The ribbon is located at the top of the window and contains different tabs, such as Home, Insert, Page Layout, and more. Each tab is divided into groups, which contain related commands and features.
3. The toolbar, also known as the Quick Access Toolbar, is located above the ribbon and provides quick access to commonly used commands, such as Save, Undo, and Redo.
4. The document area is where you create and edit your documents. It occupies most of the Word window and displays the content of your document.
5. The status bar is located at the bottom of the window and provides information about the current document, such as the page number, word count, and language settings.
Exploring the Ribbon and Toolbar:
1. The ribbon is organized into tabs, each representing a different set of features. For example, the Home tab contains commands for formatting text, applying styles, and managing paragraphs.
2. Within each tab, you'll find groups of related commands. For instance, the Font group in the Home tab allows you to change the font, size, and color of your text.
3. You can customize the ribbon by adding or removing tabs and groups to suit your preferences. Right-click on the ribbon and select "Customize the Ribbon" to access the customization options.
4. The Quick Access Toolbar contains frequently used commands. To customize it, click the drop-down arrow on the right side of the toolbar and select the desired commands.
Navigating Different Views in Word:
1. Word offers different views to cater to different needs. The default view is the Print Layout view, which displays your document as it would appear when printed.
2. You can switch to the Read Mode view, which optimizes the document for reading by hiding various editing tools and focusing on the content.
3. The Web Layout view shows how your document would appear in a web browser.
4. The Outline view provides a structured overview of your document's headings and allows you to easily navigate and rearrange sections.
5. Use the View tab in the ribbon to switch between different views and choose the one that suits your current task.


Comments
Post a Comment